Monday, September 27, 2010
Zyliss Ice cream scoop
I think any true ice cream lover has been through the wire in the search for a scoop that can scoop through the hardest ice creams and still stay standing. Since I have been making ice cream at home I haven't owned a proper scoop and decided it was time for me to invest in one. I went to the most well stocked cooking supply store in Brooklyn, A Cooks Companion on Atlantic Ave. I actually went for something else but ended up leaving with the Zyliss Ice Cream Scoop. The pink color of the scoop caught my eye (I love pink!) and I decided to pick it up...It had A nice weight to it and I liked how the scoop itself was designed, it reminded me of the scoops I used to scoop Gelato at Whole Foods. I cant remember exactly how much I paid for it but I'm sure its no more than ten dollars. On my last ice cream making binge I gave the Zyliss a test run. It went through the ice cream like butter straight from the freezer...that's a good sign! I tried to scoop perfect balls but didn't get it on the first try but the next day I got alot closer. Overall I give the Zyliss 90%, It didn't scoop perfect balls for be but it came very close and I love the design and colors. I would definitely recommend it and if you are looking to buy Amazon.com has it for $6.99 and free shipping.
Happy Scooping!
Sunday, September 26, 2010
Pesto and Smoked Mozzarella Pizza
When I worked at Whole Foods Markets in Tribeca that's when I learned about a bevy a new foods, I mean I always tried to keep abreast of old and new things to devour in the food world but having a new job in a natural and organic market gave me the chance to learn about new things on a consistent basis and also be able to afford it. My area at work was in the cafe operated by the bakery section and we used to make crepes both sweet and savory. One of my favorites was the tomato, pesto, and smoked mozzarella. From first taste I fell in love with smoked mozzarella from first bite and always bought it when given the chance.
Though I no longer work at whole foods and hardly shop there since Sahadi's in Brooklyn is much cheaper stocking the same specialty items I need. When I went on my last pizza making adventure I decided to try something different and took inspiration from my favorite crepe. I used the same dough recipe from A Year in Bread blog, and my pesto was store bought but you can make your own at home
Pesto and Smoked Mozzarella Pizza
Pizza Dough
bread flour 3 c 700 ml 15 oz 424 g (plus a little more added while kneading the dough)
instant yeast 1 tsp 5 ml 1/8 oz 3 g
salt 2 tsp 10 ml 3/8 oz 10 g
lukewarm water (about 90F, 32C) 1 1/3 c 315 ml 11 1/2 oz 325 g
Place the bread flour in a large bowl. Stir in the yeast and salt. Add the water and stir until a soft, but not sticky, dough forms.
Turn the dough onto a floured surface and knead it for 3 minutes, sprinkling with a little flour each time it sticks to your hands or the counter. The dough should be quite soft. (Just knead it by hand. It's easier and faster than getting out your big electric mixer. Yes, Kevin, this means even you.)
Liberally sprinkle the mixing bowl with flour, place the dough back in it, and sprinkle the top of the dough with flour. Cover with a damp tea towel or cloth napkin and set in a warm place for two hours.
After about an hour, place a baking stone on the lowest rack in the oven, and set the temperature at 500 degrees. (You never want to put a cold baking stone into a hot oven as it may crack.)
Turn the risen dough out onto a lightly floured surface, and divide it into two or four pieces. (I use a pastry scraper, sometimes called a dough scraper or bench scraper, which is a handly little gizmo that is also great for cleaning off my butcher block countertop). Flatten each piece of dough into a disk and let them rest for 10 to 15 minutes.
Pizza Topping
1/2 cup pesto sauce
1 cup of smoked mozzarella, sliced
On prepared pizza dough, spread pesto sauce on dough and top with slices of smoked mozzarella
Bake until crust is browned.
Saturday, September 25, 2010
Muenster Scallion Biscuits
This was my take on an already existing recipe utilizing ingredients I could easily get in my neighborhood supermarket. The recipe was from Smitten Kitchen (I love the recipes there) and it turned out perfect. The biscuits were easy to make and the texture was so tender. The recipe at SK called for blue cheese but I used muenster and I am sure you can you any cheese your heart desires as well. So I followed the SK recipe exactly except for chopping sliced muenster cheese and chopping it to tiny bits. When I took my biscuits out the oven I immediately brushed them with some melted butter, but to save yourself the calories you can definitely leave out that step.
Blue Cheese Scallion Drop Biscuits
2 1/4 cups all-purpose flour
2 1/2 teaspoons baking powder
2 teaspoons sugar
3/4 teaspoon baking soda
1 teaspoon salt
6 tablespoons (3/4 stick or 3 ounces) cold unsalted butter, cut into 1/2-inch cubes
1 1/2 cups crumbled blue cheese
4 scallions, finely chopped
1 cup well-shaken buttermilk (or, you can make your own)
Preheat oven to 450°F. Whisk together flour, baking powder, sugar, baking soda, and salt in a bowl, then blend in butter with your fingertips until mixture resembles coarse meal. Stir in blue cheese and scallions. Add buttermilk and stir until just combined.
Drop dough in 12 equal mounds about 2 inches apart onto a buttered large baking sheet, or one lined with parchment paper. Bake in middle of oven until golden, 16 to 20 minutes.
Monday, September 20, 2010
Lemon-Lime Iced Tea
Its almost the end of September but the temperature in NYC is still in the late 70's early 80's so its still perfect weather to enjoy a cold glass of iced tea. I'm not talking about that powdered over sweetened stuff you can buy on supermarket shelves but the even tastier kind you can make just as quickly yourself. Don't get me wrong I used to enjoy the hell outta instant ice tea as a kid but as I grew and my taste refined I moved away to freshly brewed tea. Today I want to share a very simple recipe for iced tea you can make in about 20 minutes.
Lemon-Lime Ice Tea
2 quarts boiling hot water
2 quarts cold water
10 black tea bags (I used tetley)
3/4 cup fresh lemon and lime juice
handful of fresh mint and lemon verbena leaves, optional but strongly recommended
sweetener to taste (sugar, splenda, honey, etc)
1. In a gallon sized pitcher throw in mint and lemon verbena leaves if using along with tea bags.
2. Add in hot water and steep the leaves and tea for around 10 minutes
3. Remove tea bags and leaves
4. Add in lemon lime juice and sweeten to taste
5. Slices of fresh lemon and lime can be used for garnish
6. Enjoy!
Friday, September 17, 2010
Red Velvet Cake
Monday, September 13, 2010
Restaurant Management
This post is aside from my regular recipe post but as time goes on you will see see a larger variety of post coming from me. Currently I am on the road to graduation and I am feeling like a combustible ball of excitement and fear about what the future holds. I would like to do so many things but most importantly I would like my career to involve food writing and traveling. My dream has also been to have a brick and mortar place of my own. Since I was a kid family and friends that tried my baked goods have always told me to open a place of my own and that it will be flooded with people, but anyone in the industry knows that opening a business is not as easy as 1,2,3. Most new restaurant fail within the first few years so proper research is definitely needed before any contracts are signed. I don't have any mentors currently and I really need to take the initiative to look for a few so I can have someone in the industry to guide me along this journey. Fast forward to today which was the first day of my restaurant management class. So far I think it will be the most beneficial class of my semester. The ultimate goal of the class is to make an official business plan for your business. This really came like a blessing in disguise and I cannot wait to learn all the strategies and tips a new business owner would need to have a successful restaurant/bakery/lounge/etc.
Sunday, September 12, 2010
Monkey Bread
I have been intrigued with making monkey bread ever since I saw the movie Beauty Shop with that lady trying to sell her monkey bread to everyone in the salon. I actually didn't know what it was at the time but I caught my first glimpse at Brown Eyed Baker. I really did not want to use refrigerated dinner rolls from the supermarket so I was elated to see that this recipe was entirely from scratch. I didn't make the recipe the same time I saw it, but one day before school I was feeling for something sweet and I decided to make it since I had all the ingredients on hand. This recipe was pretty much perfect taste wise but I did have to use more cinnamon sugar than indicated because I ran out half way through. The dough was very soft inside and the outside caramelized beautifully.I opted not to use the glaze because I thought it would have made everything overly sweet for my family's taste, but it is nice for presentation. My family and friends thought it was so good and they devoured the entire thing.
Monkey Bread
Yield: 1 loaf, serving 6 to 8
Total Prep Time: 1 hour | Total Rise Time: 2 hours | Bake Time: 35 minutes
Dough:
4 tablespoons unsalted butter, divided, 2 tablespoons softened and 2 tablespoons melted
1 cup milk, warm (about 110 degrees F)
1/3 cup water, warm (about 110 degrees F)
¼ cup granulated sugar
1 package instant yeast
3¼ cups all-purpose flour, plus extra for work surface
2 teaspoons salt
4 tablespoons unsalted butter, divided, 2 tablespoons softened and 2 tablespoons melted
1 cup milk, warm (about 110 degrees F)
1/3 cup water, warm (about 110 degrees F)
¼ cup granulated sugar
1 package instant yeast
3¼ cups all-purpose flour, plus extra for work surface
2 teaspoons salt
Brown Sugar Coating:
1 cup light brown sugar
2 teaspoons ground cinnamon
8 tablespoons unsalted butter (1 stick), melted
1 cup light brown sugar
2 teaspoons ground cinnamon
8 tablespoons unsalted butter (1 stick), melted
Glaze:
1 cup confectioners’ sugar
2 tablespoons milk
1 cup confectioners’ sugar
2 tablespoons milk
1. Butter Bundt pan with 2 tablespoons softened butter. Set aside.
2. In a large measuring cup, mix together milk, water, melted butter, sugar and yeast. Mix flour and salt in standing mixer fitted with dough hook. Turn machine to low and slowly add milk mixture. After dough comes together, increase speed to medium and mix until dough is shiny and smooth, 6 to 7 minutes. Turn dough onto lightly floured counter and knead briefly to form smooth, round ball. Coat large bowl with nonstick cooking spray. Place dough in bowl and coat surface of dough with cooking spray. Cover bowl with plastic wrap and place in a draft-free area until dough doubles in size, 50 to 60 minutes.
3. For the sugar coating: While the dough is rising, mix brown sugar and cinnamon together in a bowl. Place melted butter in second bowl. Set aside.
4. To form the bread: Gently remove the dough from the bowl, and pat into a rough 8-inch square. Using a bench scraper or knife, cut dough into 64 pieces.
5. Roll each dough piece into a ball. Working one at a time, dip the balls into the melted butter, allowing excess butter to drip back into the bowl. Roll in the brown sugar mixture, then layer balls in the Bundt pan, staggering seams where dough balls meet as you build layers.
6. Cover the Bundt pan tightly with plastic wrap and place in draft-free area until dough balls are puffy and have risen 1 to 2 inches from top of pan, 50 to 70 minutes.
7. Preheat oven to 350 degrees F. Unwrap the pan and bake until the top is deep brown and caramel begins to bubble around the edges, 30 to 35 minutes. Cool in the pan for 5 minutes, then turn out onto a platter and allow to cool slightly, about 10 minutes.
8. For the glaze: While the bread cools, whisk the confectioners’ sugar and milk in a small bowl until the lumps are gone. Using a whisk, drizzle the glaze over the monkey bread, letting it run over top and down the sides of the bread. Serve warm.
*Note: To make without a stand mixer: In step 2, mix the flour and salt in a large bowl. Make a well in the flour, then add the milk mixture to the well. Using a wooden spoon, stir until the dough becomes shaggy and is difficult to stir. Turn out the dough onto a lightly floured work surface and begin to knead, incorporating the shaggy scraps back into the dough. Knead until dough is smooth and satiny, about 10 minutes. Shape into a taut ball and proceed as directed.
Saturday, September 11, 2010
Vanilla Sugar
Thursday, September 9, 2010
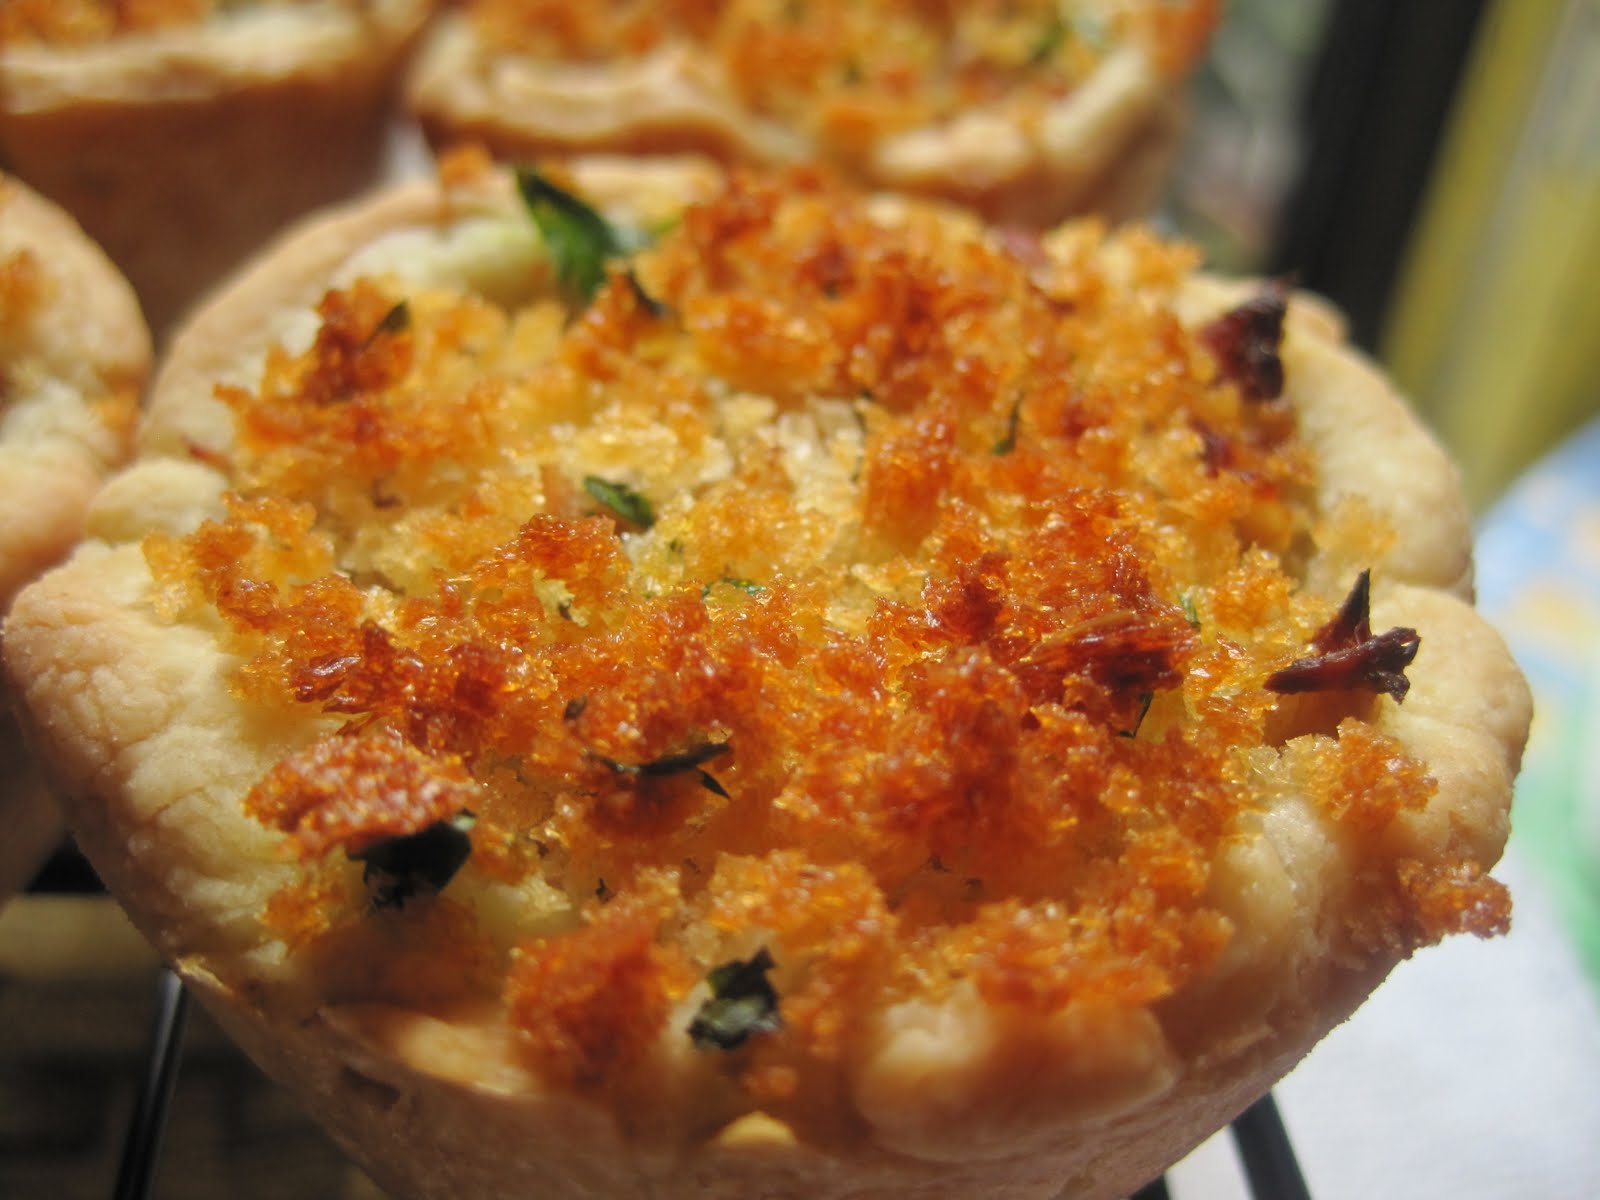
Tuna Tarts with Olive Oil Infused Panko Crust
Keeping with yesterdays theme I decided to make more tarts but instead of sweet I went for savory. I had tuna on hand so I decide to use that as my filling. So I cooked up my tuna filling with my aromatics and set it aside. Then while thinking about my presentation I decided that something would need to go on top to 1. add some pizazz and 2. stop the tuna from browning too much. I was drawing a blank for a couple minutes and then thought of my panko crumbs sitting in the cabinet and knew that would make a nice crust. While looking at food magazines or coking blogs I seen chefs use panko to top items and it would get a nice golden color so I decided that I could do the same thing for my tarts. I rolled out my pastry and filled it with fish and then topped it with my panko crumbs mixed with olive oil. After I pulled the first batch of tarts out of the oven they looked delish but I still thought they could use something more. For the second batch I mixed chopped fresh parsley into the bred crumb mixture to add color.
When this second batch came out the oven they looked perfect! I really couldn't wait to eat one. After I couple minutes to cool and let the flavors settle I finally bit in and guess what...they tasted FABULOUS! This is a dish that I am really proud of not only for the taste but for the presentation. Decorating and finishing has never been my strong point to when something I make looks as great as it taste it makes me exceptionally proud. To make this follow the same steps from the Almond Tartlets and use the flaky pastry recipe for you shell, this recipe makes 25. Here are the recipes for the tuna filling and panko crust:
Tuna Filling
25 ounces of tuna (5 cans)
1 hot pepper
1/2 small onion
5 garlic cloves
3 tbsp olive oil
juice of one lemon
salt to taste
- Open and drain cans of tuna, set aside
- mince hot pepper, onion, and garlic, set aside
- Heat saucepan with oil
- saute onion, pepper, garlic, tuna all together
- add in lemon juice and salt
- Cook for 3-5 minutes
- Set aside
**Typically warm filling shouldn't go into a pie crust but it works fine for this recipe.
Panko Crust
1 cup panko crumbs
2 tsp olive oil
a couple fresh sprigs of parsley
- Mix all ingredients together and set aside to top tarts
Wednesday, September 8, 2010
Almond Tartlets
Then I filled then with 1 tbsp of frangipane and topped with spiced almonds.
After 25 minutes in the oven at 400 degrees this is what I got.
I think these pictures speak for themselves, and the recipe definitely is not hard to do. So if you want to give it a try here's the recipe. Enjoy
Flaky Pastry
4 cups pastry flour
1 1/2 cups unslted butter
1/2 cup ice cold water
2 tsp salt
1 tsp sugar
- Mix together dry ingredients in a large bowl and set aside.
- Cut butter into tsp sized pieces then cut into flour mixture with a pastry blender until it resembles pea size pieces.
- Mix in cold water gently until just absorbed. DO NOT OVERWORK!
- Wrap the dough in plastic wrap and refrigerate overnight.
Frangipane
10 oz Almond paste
3/4 cup butter
1/4 cup brandy or amaretto
1/2 cup sugar
3 tbsp all purpose flour
1 cup almond flour
1/2 tsp vanilla extract
1 tbsp almond extract
1 egg
- Cream butter and sugar together.
- Add in egg, beat for 30 seconds
- And in remaining ingredients and beat until creamy.
** The frangipane makes too much for this exact recipe but it can be stored in the fridge in an airtight container. I used mine around 2 weeks later and it was still great.
Buttermilk Cornbread
When I think of cornbread I envision a table spread akin to the Soul food movie with fry chicken, yams, collard greens, and the like. I also think of it as a staple of not only southern cooking but American cooking. I am not new to baking cornbread and I have been putting new spins on boxes of jiffy mixes since I was a little girl adding in cheese, sausage, or extra butter. As time went on I moved away from the Jiffy boxes and started making my own from scratch but the recipes I found never really did it for me. I wanted a dense, semi sweet, semi savory bread. I kept on searching and last week found a recipe on allrecipes.com , it was a buttermilk cornbread recipe with great reviews. The recipe made 9 servings but I wanted 12 so I used to automatic recipe converter. The only strange happenings was that the recipe called for 2 3/4 eggs!? I decided that 3 whole eggs would work and only add to the cake-iness of the cornbread. I also reduced the converted amount of sugar from over 3/4 cups to only 1/2 because I didn't want it to be too sweet, and lastly I added in one tablespoon each of garlic and onion powder. I wanted to go extra southern and bake the cornbread in a cast iron skillet so I liberally greased it with butter and carried on mixing the batter. The recipe was a great success and even though I am not the biggest fan of cornbread I plan to keep the recipe for whenever I am in the mood for good ol' cornbread.
Grandmother's Buttermilk Cornbread
Preheat oven to 375 degrees F (175 degrees C). Grease an 8 inch square pan.
Melt butter in large skillet. Remove from heat and stir in sugar. Quickly add eggs and beat until well blended. Combine buttermilk with baking soda and stir into mixture in pan. Stir in cornmeal, flour, garlic powder, onion powder, and salt until well blended and few lumps remain. Pour batter into the prepared pan.
Bake in the preheated oven for 30 to 40 minutes, or until a toothpick inserted in the center comes out clean.
Grandmother's Buttermilk Cornbread
- 2/3 cup butter
- 1/2 cup white sugar
- 3 eggs
- 1-1/3 cups buttermilk
- 3/4 teaspoon baking soda
- 1-1/3 cups cornmeal
- 1-1/3 cups all-purpose flour
- 3/4 teaspoon salt
- 1 tsp garlic powder
- 1 tsp onion powder
Monday, August 30, 2010
Scallion Pancakes with Ginger Soy Dipping Sauce
Anyone that knows me knows about my dangerous love affair with Asian food. My mom tells me that she has been been eating fish and lo mein since I was in the womb and I made her eat it almost everyday. This particular Saturday night I was feeling for an Asian fix but didn't want to go all out on an entire meal...a snack would be fine. I settled on scallion pancakes since its something I love to eat when I go out for Asian and decided I might as well experiment since I had all the necessary ingredients on hand. The recipe I used for the scallion pancakes came from Use Real Butter and the dipping sauce came from Brown Eyed Baker.
The recipe was very easy to make and uses simple ingredients. I also think that next time I may add a teaspoon of salt to the dough to avoid shaking it onto the pancakes because some were a lil' to salty for my taste. As for the Dipping sauce I think I will use rice wine instead of vinegar next time and I also added in a tablespoon of sesame oil because I love how it taste. I really love the accomplished feeling of being able to make something you had to spend so much money on beforehand, truly the sweet (or in this case savory) taste of success!
Subscribe to:
Posts (Atom)