Thursday, September 30, 2010

Change of plans

Some brown rice, whole grain quinoa, and organic tortillas from whole foods.

Everyone that knows me knows that I am a long time foodie. I've had a passionate love affair with food as long as I can remember. My mom tells me I learned to read at the age of 3 and ventured into cooking soon after. I climbed on my step stool and cooked until I was tall enough to reach the stove, baked cakes for Christmas when I was 7, and made spaghetti bolognese that I still reminisce about even though I don't eat beef. When I cook I sing and it makes me happy, when I'm sad I cook to lift my spirits, when I'm happy I eat, and when I'm sad I eat. I take pleasure in reading my favorite food publications and websites to keep abreast of trends and openings and when money is flowing I take even greater pleasure in sitting down to a good meal at a great restaurant. So now that I have poured out my food lovin' soul to you, I have to confess that I cannot continue in my hungry hungry hippo ways of devouring all goodies in sight. Its not good for me and my waistline and I have a gym regimen to keep up with so too many extra calories are not gonna be conducive to the plan. With that said I have constantly been trying to keep bad food out of my diet ( minus all the sinfully good things I make at home :) and have gradually switched from conventional milk to organic, cage free/organic eggs, wild caught fish when I can afford it, and overall just switching out conventional grocery items in my home for all natural or organic when I can. In an effort to lose some more weight for an upcoming trip to Trinidad W.I for carnival I am considering going partial vegan and gluten free and upping my workout regimen when I can. I do have my doubt about this whole plan that's why it hasn't happen as yet...for instance is this food going to be as yummy as what I'm used to is my main concern for this discerning palette of mine. I have done my research and started going through the vegan and gluten free cooking blogs and have started buying ingredients to try out. I hope this wont be too much of a challenge for me and as I try recipes I will keep you all updated on my successes and failures. Hopefully it wont be too much of the latter.

Tuesday, September 28, 2010

Trinidad Smoked Herring


Growing up in a half Trinidadian household I guess it would be considered weird that I actually never ate smoked herring until I was about 19 while on an extended vacation in Trinidad. My mom says she never cooked to many her traditional dishes because she wasn't sure if we would like it, she pretty much stuck to the traditional Sunday lunch and roti. When I was staying in Trinidad for 6 months with my aunt she introduced me to this wonderful dish. Many Trinidadians consider smoked herring, saltfish, dhal, and the like to be "poor people" food...but many of the most satisfying dishes in the world come out of impoverished situations. In the US collard greens, chitterlings, and ham hocks were weeds and entrails given to the slaves to eat and now its considered a southern delicacy. Anyway back to the smoked herring...so my aunt use to always offer me smoked herring while I stayed with them but it was unfamiliar to me and I wasn't brave enough to try it. One Sunday after she cooked it she insisted that I try it so I finally took a spoonful and guess what...I LOVED IT! It was like a spicy, fishy stew, And I took a plate to eat immediately. Before I left Trinidad to come back home to NY, my aunt made sure to teach me how to make it and even gave me some of her special ingredients to bring back home. I can definitely say this is now one of my favorite dishes, and I try to enjoy it at regular intervals throughout the year. I really need to thank my aunt and cousins for encouraging me to taste so many good things and teaching me to cook numerous Trinidadian dishes during my stay. Here is the recipe for Trinidad style smoked herring. Smoked herring should be available at Asian or other ethnic markets in your area that may stock Caribbean foods. One ingredient I use is called "rookoo", it is the red coloring that comes from boiling fresh annatto seed. Some Trinidadians are not familiar with rookoo and to my knowledge it is not something that is mass produced to export so you may have to go without it unless you can make your own, but don't worry it wont change the taste of the dish if you don't have it.

Trinidad Smoked Herring
makes 4 servings
2lbs smoked herring
1 medium to large onion, cut medium dice
4 cloves garlic, chopped
1 hot pepper, seeds removed, and minced
2 tomato's, cut to large  dice
3 tbsp rookoo, if using

- remove smoke herring from package and soak for 45 minutes in boiling water
- while fish is soaking begin to prepare your other ingredients.
- drain smoked herring and search through smoked herring for excess bones and remove ( you will not get all the bones out, but they are small an thin enough to swallow)
- in frying pan put two tbsp of oil or any fat you prefer
- when oil becomes very hot throw in onion, garlic, and pepper. Saute for one minute
- Add in smoked herrings pieces and saute for 3-5 minutes till onions become translucent
- add in tomatoes and rookoo if using, continue to cook for another 3-5 minutes.
- All finished, enjoy with dhal and rice or just rice alone.

** if the smoked herring is too hot a little brown sugar added in will help cool the fire.


Dulce de Leche Ice cream


I recently picked up the book "The Perfect Scoop" by David Lebovitz after hearing all the good reviews it has been getting through the blogosphere. As soon as I took the book out of the packaging and flipped thought the pages I fell in love with the recipes on sight. I loved the color scheme, the writing style, and imagery in the book, the photographs just added to it. I picked out a number of recipes to try at once, the first being coffee, then dulce de leche, and finally white chocolate. I was really excited to be making ice cream using the creme anglaise method since I have only used the philly style egg less method thus far. I wanted to note the different textures between the two methods so I got started on this new frozen journey. I did do the coffee first but for this entry I will focus on the dulce de leche. Lebovitz doesn't have an actual recipe but I decided to add dulce de leche to the vanilla ice cream recipe. The vanilla recipe called for a mix of whole mix and cream but I always use half and half AND more cream! I had dulce de leche that I bought in Sahadi's earlier on in the month so there was no need to make any for the ice cream. I followed Lebovitz instructions but as noted earlier I did switch whole milk for half and half, I also added a little more dulce de leche than called for so that I could finish out the bottle. When I put the dulce de leche ice cream base in the ice cream maker I could already note the silkier texture of the cream anglaise based treat. When it was time to scoop a taste test I was delighted by the caramel-y taste of the ice cream and the texture was better than store bought, and best of all...I KNOW ALL WHAT WAS PUT INTO IT! That is truly the best part of making things yourself. I decided to finish the treat by making my own dulce de leche sauce in the oven. Making dulce de leche is very easy to make and is essentially one step. As soon as the dulce de leche cooled I took out the ice cream, scooped it into a bowl, and topped it with the dulce de leche. I gave the bowl of ice cream to my mom before I went out. About an hour after I went out my mom calls me and tells me listen to my voicemail...I did, and it was a VM of her raving about the ice cream and how it was so good! That made my day really because I love when people love my food, their satisfaction is the best payment even more so than money. I also gave my friends a tasting while we hung out that evening and they couldn't believe that I made that ice cream. I definitely want to thank Mr. Lebovitz for putting this book out, it has taken my ice cream making to the next level.

Dulce de Leche Ice Cream
Makes 1quart
For a richer custard, you can add up to 3 more egg yolks. For a less-rich custard, substitute half-and-half for the heavy cream, realizing that the final texture won’t be as rich or as smooth as if using cream.
1 cup (250ml) whole milk
A pinch of salt
3/4 cup (150g) sugar
1 vanilla bean, split lengthwise
2 cups (500ml) heavy cream
5 large egg yolks
1 teaspoon pure vanilla extract
1. Heat the milk, salt, and sugar in a saucepan. Scrape the seeds from the vanilla bean into the milk with a paring knife, then add the bean pod to the milk. Cover, remove from heat, and infuse for one hour.
2. To make the ice cream, set up an ice bath by placing a 2-quart (2l) bowl in a larger bowl partially filled with ice and water. Set a strainer over the top of the smaller bowl and pour the cream into the bowl.
3. In a separate bowl, stir together the egg yolks. Rewarm the milk then gradually pour some of the milk into the yolks, whisking constantly as you pour. Scrape the warmed yolks and milk back into the saucepan.
4. Cook over low heat, stirring constantly and scraping the bottom with a heat-resistant spatula, until the custard thickens enough to coat the spatula.
5. Strain the custard into the heavy cream. Stir over the ice until cool, add the vanilla extract, then refrigerate to chill thoroughly. Preferably overnight.
6. Remove the vanilla bean and freeze the custard in your ice cream maker according to the manufacturer’s instructions.
Note: Used vanilla beans can be rinsed and dried, then stored in a bin of sugar. That sugar can be used for baking and, of course, for future ice cream making.
* This is the vanilla recipe from David Lebovitz Blog but to make it dulce de leche just add in 1cup Dulce de leche during step 5 after strain the custard into the heavy cream.
Dulce de Leche Sauce

Take one 14oz can of condense milk and put it into a 9in glass or nonreactive pan, sprinkle with salt, and bake in a 425 degree oven for an hour and 15 minutes to an hour and a half. 
* The book says to stir the sauce at regular intervals while its in the oven but I did not stir it and it was fine.
When you take the sauce out of the oven stir with a whip until cooled and top your dessert. Lebovitz says the sauce can be stored in the refrigerator for up to two months.

Monday, September 27, 2010

Zyliss Ice cream scoop


I think any true ice cream lover has been through the wire in the search for a scoop that can scoop through the hardest ice creams and still stay standing. Since I have been making ice cream at home I haven't owned a proper scoop and decided it was time for me to invest in one. I went to the most well stocked cooking supply store in Brooklyn, A Cooks Companion on Atlantic Ave. I actually went for something else but ended up leaving with the Zyliss Ice Cream Scoop. The pink color of the scoop caught my eye (I love pink!) and I decided to pick it up...It had A nice weight to it and I liked how the scoop itself was designed, it reminded me of the scoops I used to scoop Gelato at Whole Foods. I cant remember exactly how much I paid for it but I'm sure its no more than ten dollars. On my last ice cream making binge I gave the Zyliss a test run. It went through the ice cream like butter straight from the freezer...that's a good sign! I tried to scoop perfect balls but didn't get it on the first try but the next day I got alot closer. Overall I give the Zyliss 90%, It didn't scoop perfect balls for be but it came very close and I love the design and colors. I would definitely recommend it and if you are looking to buy Amazon.com has it for $6.99 and free shipping.

Happy Scooping!

Sunday, September 26, 2010

Pesto and Smoked Mozzarella Pizza


When I worked at Whole Foods Markets in Tribeca that's when I learned about a bevy a new foods, I mean I always tried to keep abreast of old and new things to devour in the food world but having a new job in a natural and organic market gave me the chance to learn about new things on a consistent basis and also be able to afford it. My area at work was in the cafe operated by the bakery section and we used to make crepes both sweet and savory. One of my favorites was the tomato, pesto, and smoked mozzarella. From first taste I fell in love with smoked mozzarella from first bite and always bought it when given the chance.
Though I no longer work at whole foods and hardly shop there since Sahadi's in Brooklyn is much cheaper stocking the same specialty items I need. When I went on my last pizza making adventure I decided to try something different and took inspiration from my favorite crepe. I used the same dough recipe from A Year in Bread blog, and my pesto was store bought but you can make your own at home

Pesto and Smoked Mozzarella Pizza

Pizza Dough
bread flour 3 c 700 ml 15 oz 424 g (plus a little more added while kneading the dough)


instant yeast 1 tsp 5 ml 1/8 oz 3 g


salt 2 tsp 10 ml 3/8 oz 10 g


lukewarm water (about 90F, 32C) 1 1/3 c 315 ml 11 1/2 oz 325 g


Place the bread flour in a large bowl. Stir in the yeast and salt. Add the water and stir until a soft, but not sticky, dough forms.

Turn the dough onto a floured surface and knead it for 3 minutes, sprinkling with a little flour each time it sticks to your hands or the counter. The dough should be quite soft. (Just knead it by hand. It's easier and faster than getting out your big electric mixer. Yes, Kevin, this means even you.) 

Liberally sprinkle the mixing bowl with flour, place the dough back in it, and sprinkle the top of the dough with flour. Cover with a damp tea towel or cloth napkin and set in a warm place for two hours.

After about an hour, place a baking stone on the lowest rack in the oven, and set the temperature at 500 degrees. (You never want to put a cold baking stone into a hot oven as it may crack.)

Turn the risen dough out onto a lightly floured surface, and divide it into two or four pieces. (I use a pastry scraper, sometimes called a dough scraper or bench scraper, which is a handly little gizmo that is also great for cleaning off my butcher block countertop). Flatten each piece of dough into a disk and let them rest for 10 to 15 minutes.


Pizza Topping
1/2 cup pesto sauce
1 cup of smoked mozzarella, sliced

On prepared pizza dough, spread pesto sauce on dough and top with slices of  smoked mozzarella
Bake until crust is browned.


Saturday, September 25, 2010

Muenster Scallion Biscuits


This was my take on an already existing recipe utilizing ingredients I could easily get in my neighborhood supermarket. The recipe was from Smitten Kitchen (I love the recipes there) and it turned out perfect. The biscuits were easy to make and the texture was so tender. The recipe at SK called for blue cheese but I used muenster and I am sure you can you any cheese your heart desires as well. So I followed the SK recipe exactly except for chopping sliced muenster cheese and chopping it to tiny bits. When I took my biscuits out the oven I immediately brushed them with some melted butter, but to save yourself the calories you can definitely leave out that step.


Blue Cheese Scallion Drop Biscuits
2 1/4 cups all-purpose flour
2 1/2 teaspoons baking powder
2 teaspoons sugar
3/4 teaspoon baking soda
1 teaspoon salt
6 tablespoons (3/4 stick or 3 ounces) cold unsalted butter, cut into 1/2-inch cubes
1 1/2 cups crumbled blue cheese
4 scallions, finely chopped
1 cup well-shaken buttermilk (or, you can make your own)

Preheat oven to 450°F. Whisk together flour, baking powder, sugar, baking soda, and salt in a bowl, then blend in butter with your fingertips until mixture resembles coarse meal. Stir in blue cheese and scallions. Add buttermilk and stir until just combined.
Drop dough in 12 equal mounds about 2 inches apart onto a buttered large baking sheet, or one lined with parchment paper. Bake in middle of oven until golden, 16 to 20 minutes.

Monday, September 20, 2010

Lemon-Lime Iced Tea


Its almost the end of September but the temperature in NYC is still in the late 70's early 80's so its still perfect weather to enjoy a cold glass of iced tea. I'm not talking about that powdered over sweetened stuff you can buy on supermarket shelves but the even tastier kind you can make just as quickly yourself. Don't get me wrong I used to enjoy the hell outta instant ice tea as a kid but as I grew and my taste refined I moved away to freshly brewed tea. Today I want to share a very simple recipe for iced tea you can make in   about 20 minutes.

Lemon-Lime Ice Tea
2 quarts boiling hot water
2 quarts cold water
10 black tea bags (I used tetley)
3/4 cup fresh lemon and lime juice
handful of fresh mint and lemon verbena leaves, optional but strongly recommended
sweetener to taste (sugar, splenda, honey, etc)

1. In a gallon sized pitcher throw in mint and lemon verbena leaves if using along with tea bags.
2. Add in hot water and steep the leaves and tea for around 10 minutes
3. Remove tea bags and leaves
4. Add in lemon lime juice and sweeten to taste
5. Slices of fresh lemon and lime can be used for garnish
6. Enjoy!

Friday, September 17, 2010

Red Velvet Cake


Between red velvet and baileys cake I don't know which one seems to be the bigger phenomenon, they both seem to be all the buzz right now along with a few other drink inspired cake flavors but my focus for today will be the beloved red velvet cake. I am a seasoned red velvet baker and already had my go to recipe that I tweaked slightly from baking 911, but my cake never came out as red as I saw it in the bakeries and that baffled me. I kept reducing the amount of cocoa in the recipe I had for it to take on a brighter red color but it always came out a maroon hued. But the flavor was there and I liked it but friends of mine didn't seem to think it was red velvet cake because it was so dark. To my knowledge red velvet cake should be on the maroon colored side instead of a bright red if it is indeed supposed to be a cocoa based cake. But while doing my research on different recipes it seems that the brightest of red velvets are not cocoa based caked but vanilla cakes with a touch of cocoa powder and heaps of red food coloring. And by no means am I bashing red velvet cake, I think its a beautiful presentation cake but what is its flavor profile or its claim to fame? To me its just a buttermilk cake dyed red for show...but hey whatever makes people happy right? So last week in my search to make that "perfect" red velvet cake that I see in bakeries I stumbled across a recipe at  Joy of Baking. The recipe she uses is "the one" and I paired it with the frosting she suggested from the Waldorf Astoria Hotel cookbook. I had my own cream cheese frosting but I really waited to try her marscapone cheese frosting. Making this cake was fairly easy and the only new step was making the bubbly concoction of vinegar and baking soda to add to the cake batter after mixing. The next day when i leveled the cake to make my layers I knew I found the perfect recipe. The color, taste, and texture of the cake was unbelievably good. The frosting recipe was easy to make as well. It was my first time making a whip cream based frosting at home and I was only hoping that it would not deflate after a couple hours. When I finished mixing the frosting and I tasted it...it was also a prefect 10. Personally I will try to make the frosting a little more stiff for my liking but I could tell it would hit a home run with certain people because it was not heavy or overly sweet like the typical powder sugar cream cheese frosting's. My family loved the cake and my sister demolished it by herself in a days time! This is definitely a cake I would stick with because it is a crowd pleaser.


Monday, September 13, 2010

Restaurant Management

This post is aside from my regular recipe post but as time goes on you will see see a larger variety of post coming from me. Currently I am on the road to graduation and I am feeling like a combustible ball of excitement and fear about what the future holds. I would like to do so many things but most importantly I would like my career to involve food writing and traveling. My dream has also been  to have a brick and mortar place of my own. Since I was a kid family and friends that tried my baked goods have always told me to open a place of my own and that it will be flooded with people, but anyone in the industry knows that opening a business is not as easy as 1,2,3. Most new restaurant fail within the first few years so proper research is definitely needed before any contracts are signed. I don't have any mentors currently and I really need to take the initiative to look for a few so I can have someone in the industry to guide me along this journey. Fast forward to today which was the first day of my restaurant management class. So far I think it will be the most beneficial class of my semester. The ultimate goal of the class is to make an official business plan for your business. This really came like a blessing in disguise and I cannot wait to learn all the strategies and tips a new business owner would need to have a successful restaurant/bakery/lounge/etc.

Sunday, September 12, 2010

Monkey Bread


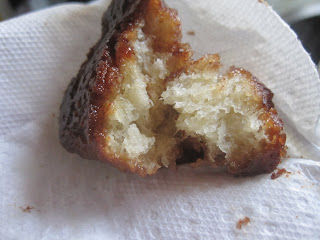
I have been intrigued  with making monkey bread ever since I saw the movie Beauty Shop with that lady trying to sell her monkey bread to everyone in the salon. I actually didn't know what it was  at the time but I caught my first glimpse at Brown Eyed Baker. I really did not want to use refrigerated dinner rolls from the supermarket so I was elated to see that this recipe was entirely from scratch. I didn't make the recipe the same time I saw it, but one day before school I was feeling for something sweet and I decided to make it since I had all the ingredients on hand. This recipe was pretty much perfect taste wise but I did have to use more cinnamon sugar than indicated because I ran out half way through. The dough was very soft inside and the outside caramelized beautifully.I opted not to use the glaze because I thought it would have made everything overly sweet for my family's taste, but it is nice for presentation.  My family and friends thought it was so good and they devoured the entire thing.


Monkey Bread
Yield: 1 loaf, serving 6 to 8
Total Prep Time: 1 hour | Total Rise Time: 2 hours | Bake Time: 35 minutes
Dough:
4 tablespoons unsalted butter, divided, 2 tablespoons softened and 2 tablespoons melted
1 cup milk, warm (about 110 degrees F)
1/3 cup water, warm (about 110 degrees F)
¼ cup granulated sugar
1 package instant yeast
3¼ cups all-purpose flour, plus extra for work surface
2 teaspoons salt
Brown Sugar Coating:
1 cup light brown sugar
2 teaspoons ground cinnamon
8 tablespoons unsalted butter (1 stick), melted
Glaze:
1 cup confectioners’ sugar
2 tablespoons milk
1. Butter Bundt pan with 2 tablespoons softened butter. Set aside.
2. In a large measuring cup, mix together milk, water, melted butter, sugar and yeast. Mix flour and salt in standing mixer fitted with dough hook. Turn machine to low and slowly add milk mixture. After dough comes together, increase speed to medium and mix until dough is shiny and smooth, 6 to 7 minutes. Turn dough onto lightly floured counter and knead briefly to form smooth, round ball. Coat large bowl with nonstick cooking spray. Place dough in bowl and coat surface of dough with cooking spray. Cover bowl with plastic wrap and place in a draft-free area until dough doubles in size, 50 to 60 minutes.
3. For the sugar coating: While the dough is rising, mix brown sugar and cinnamon together in a bowl. Place melted butter in second bowl. Set aside.
4. To form the bread: Gently remove the dough from the bowl, and pat into a rough 8-inch square. Using a bench scraper or knife, cut dough into 64 pieces.
5. Roll each dough piece into a ball. Working one at a time, dip the balls into the melted butter, allowing excess butter to drip back into the bowl. Roll in the brown sugar mixture, then layer balls in the Bundt pan, staggering seams where dough balls meet as you build layers.
6. Cover the Bundt pan tightly with plastic wrap and place in draft-free area until dough balls are puffy and have risen 1 to 2 inches from top of pan, 50 to 70 minutes.
7. Preheat oven to 350 degrees F. Unwrap the pan and bake until the top is deep brown and caramel begins to bubble around the edges, 30 to 35 minutes. Cool in the pan for 5 minutes, then turn out onto a platter and allow to cool slightly, about 10 minutes.
8. For the glaze: While the bread cools, whisk the confectioners’ sugar and milk in a small bowl until the lumps are gone. Using a whisk, drizzle the glaze over the monkey bread, letting it run over top and down the sides of the bread. Serve warm.
*NoteTo make without a stand mixer: In step 2, mix the flour and salt in a large bowl. Make a well in the flour, then add the milk mixture to the well. Using a wooden spoon, stir until the dough becomes shaggy and is difficult to stir. Turn out the dough onto a lightly floured work surface and begin to knead, incorporating the shaggy scraps back into the dough. Knead until dough is smooth and satiny, about 10 minutes. Shape into a taut ball and proceed as directed.


Saturday, September 11, 2010

Vanilla Sugar


I think vanilla is one of the simplest and most loved flavors known to man. Vanilla ice cream still being the most popular flavors after the invention of so many others speaks volumes. I like to add vanilla flavor to most sweet goods that I make and was thinking of ways to add more vanilla goodness to them. When I made vanilla ice cream a few weeks ago I bought fresh vanilla beans to use, and after I scraped them I didn't want to discard the pods and thought that I could infuse the flavor into something...then it clicked in my head! Why not use the vanilla pods to make vanilla sugar. Sugar, salts, and oils are preservative and you can keep virtually anything in them for long periods of time, you can also infuse them with almost anything. When I made my vanilla sugar I didn't use exact measurements but I did have two scraped bean pods and I used them  in about 2 cups of granulated sugar. I double bagged it and put it away in my baking supply box. When I checked it a week later I was greeted by the splendid smell of vanilla. Making this is very rewarding and save you money from buying vanilla infused sugar in specialty stores, hope you decide to try it out.

Thursday, September 9, 2010

Tuna Tarts with Olive Oil Infused Panko Crust


Keeping with  yesterdays theme I decided to make more tarts but instead of sweet I went for savory. I had tuna on hand so I decide to use that as my filling. So I cooked up my tuna filling with my aromatics and set it aside. Then while thinking about my presentation I decided that something would need to go on  top to 1. add some pizazz and 2. stop the tuna from browning too much. I was drawing a blank for a couple minutes and  then thought of my panko crumbs sitting in the cabinet and knew that would make a nice crust.  While looking at food magazines or coking blogs I seen chefs use panko to top items and it would get a nice golden color so I decided that I could do the same thing for my tarts. I rolled out my pastry and filled it with fish and then topped it with my panko crumbs mixed with olive oil.  After I pulled the first batch of  tarts out of the oven they looked delish but I still thought they could use something more. For the second batch I mixed chopped fresh parsley into the bred crumb mixture to  add color.

When this second batch came out the oven  they looked perfect! I really couldn't wait to eat one. After I couple minutes to cool and let the flavors settle I finally bit in and guess what...they tasted FABULOUS! This is a dish that I am really proud of not only for the taste but for the presentation. Decorating and finishing has never been my strong point to when something I make looks as great as it taste it makes me exceptionally proud. To make this follow the same steps from the Almond Tartlets  and use the flaky pastry recipe for you shell, this recipe makes 25. Here are the recipes for the tuna filling and panko crust:

Tuna Filling
25 ounces of tuna (5 cans)
1 hot pepper
1/2 small onion
5 garlic cloves
3 tbsp olive oil
juice of one lemon
salt to taste
- Open and drain cans of tuna, set aside
- mince hot pepper, onion, and garlic, set aside
- Heat saucepan with oil
- saute onion, pepper, garlic, tuna all together 
- add in lemon juice and salt
 - Cook for 3-5 minutes
- Set aside

**Typically warm filling shouldn't go into a pie crust but it works fine for this recipe.

Panko Crust
1 cup panko crumbs
2 tsp olive oil
a couple fresh sprigs of parsley

- Mix all ingredients together and set aside to top tarts
- 1 tsp per tart should do.


Wednesday, September 8, 2010

Almond Tartlets


I am not one for surprises....I mean really I don't like surprises. I'm a girl that will read the spoiler for a movie and still watch it, but the surprise with this unexpected recipe invention was definitely a welcomed one. It all started by me having some extra frangipane in the fridge from some almond danish I made. I really wanted to make a large almond tart in the scalloped pan but a lack of funds to buy the pan sent that dream up in smoke. So I tried to figure out what else I could do to utilize the almond-y goodness in the fridge without breaking the bank to buy new equipment. I wouldn't dare use a regular bar pan because I wasn't sure if I could achieve perfect edges in that way so I settled on using my muffin pan since I though the smaller individual size would be easier to control. Now to start the actual recipe. What crust to use??? Flaky pie dough, pate brisee, mealy dough?? I settled on flaky and decided it was small enough that I wouldn't have to blind bake it. Last night I mixed up my flaky pie dough and put it the fridge to rest overnight. In the morning I got straight to work but rolling it out and and cutting into little circles. I had lost my circular cookie cutter so I had to use a drinking glass but it worked just fine.  So I shaped the pieces of pie dough into their spaces and filled with 1/2 tsp of peach preserves but you could use whatever your heart desires.
Then I filled then with 1 tbsp of frangipane and topped with spiced almonds.
After 25 minutes in the oven at 400 degrees this is what I got.

 
I think these pictures speak for themselves, and the recipe definitely is not hard to do. So if you want to give it a try here's the recipe. Enjoy

Flaky Pastry
4 cups pastry flour
1 1/2 cups unslted butter
1/2 cup ice cold water
2 tsp salt
1 tsp sugar
- Mix together dry ingredients in a large bowl and set aside.
- Cut butter into tsp sized pieces then cut into flour mixture with a pastry blender until it resembles pea size pieces.
- Mix in cold water gently until just absorbed. DO NOT OVERWORK!
 - Wrap the dough in plastic wrap and refrigerate overnight.

Frangipane
10 oz Almond paste
3/4 cup butter
1/4 cup brandy or amaretto
1/2 cup sugar
3 tbsp all purpose flour
1 cup almond flour
1/2 tsp vanilla extract
1 tbsp almond extract
1 egg

- Cream butter and sugar together. 
 - Add in egg, beat for 30 seconds
 - And in remaining ingredients and beat until creamy.

** The frangipane makes too much for this exact recipe but it can be stored in the fridge in an airtight container. I used mine around 2 weeks later and it was still great.


Buttermilk Cornbread


When I think of cornbread I envision a table spread akin to the Soul food movie with fry chicken, yams, collard greens, and the like. I also think of it as a staple of  not only southern cooking but American cooking. I am not new to baking cornbread and I have been putting new spins on boxes of jiffy mixes since I was a little girl adding in cheese, sausage, or extra butter. As time went on I moved away from the Jiffy boxes and started making my own from scratch but the recipes I found never really did it for me. I wanted a dense, semi sweet, semi savory bread. I kept on searching and last week found a recipe on allrecipes.com , it was a buttermilk cornbread recipe with great reviews. The recipe made 9 servings but I wanted 12 so I used to automatic recipe converter. The only strange happenings was that the recipe called for 2 3/4 eggs!? I decided that 3 whole eggs would work and only add to the cake-iness of the cornbread.  I also reduced the converted amount of sugar from over 3/4 cups to only 1/2 because I didn't want it to be too sweet, and lastly I added in one tablespoon each of garlic and onion powder. I wanted to go extra southern and bake the cornbread in a cast iron skillet so I liberally greased it with butter and carried on mixing the batter. The recipe was a great success and even though I am not the biggest fan of cornbread I plan to keep the recipe for whenever I am in the mood for good ol' cornbread.


Grandmother's Buttermilk Cornbread


  • 2/3 cup butter
  • 1/2 cup white sugar
  • 3 eggs
  • 1-1/3 cups buttermilk
  • 3/4 teaspoon baking soda
  • 1-1/3 cups cornmeal
  • 1-1/3 cups all-purpose flour
  • 3/4 teaspoon salt
  • 1 tsp garlic powder
  • 1 tsp onion powder


  • Preheat oven to 375 degrees F (175 degrees C). Grease an 8 inch square pan.


  • Melt butter in large skillet. Remove from heat and stir in sugar. Quickly add eggs and beat until well blended. Combine buttermilk with baking soda and stir into mixture in pan. Stir in cornmeal, flour, garlic powder, onion powder, and salt until well blended and few lumps remain. Pour batter into the prepared pan.


  • Bake in the preheated oven for 30 to 40 minutes, or until a toothpick inserted in the center comes out clean.